Power, Quietly: A Cable Management & Power-Safety Blueprint for Modern Desks | DeskDen Supplies
Share
Prologue
Order is a kindness you can feel with your feet. A disciplined desk hums without showing its lungs—no snarled cords, no hanging bricks, no wandering adapters. Power should be safe, labeled, reachable, and invisible. This is a precise blueprint—from outlet to device—for building a workstation that looks as calm as it works.
1) The Power Spine (build this first)
What you need
-
Surge protector or UPS (battery backup) mounted under the desk, not on the floor.
-
Cable tray or raceway spanning the underside of the desktop.
-
Short patch cables (0.5–3 ft) to replace overlong OEM cords.
-
Velcro ties (reusable), adhesive cable clips, and labeler.
Mounting rules
-
Position the surge/UPS on the rear, non-knee side of the desk; leave 2–3 in of airflow.
-
Run the single wall cord down the back leg inside a vertical raceway; end with a flat plug if the outlet is behind furniture.
-
Put the cable tray parallel to the desk’s back edge; it carries chargers, excess slack, and power bricks so nothing dangles.
Why UPS?
-
It smooths blips, lets you save work when power drops, and protects sensitive gear. For towers or docking stations, it’s cheap insurance.
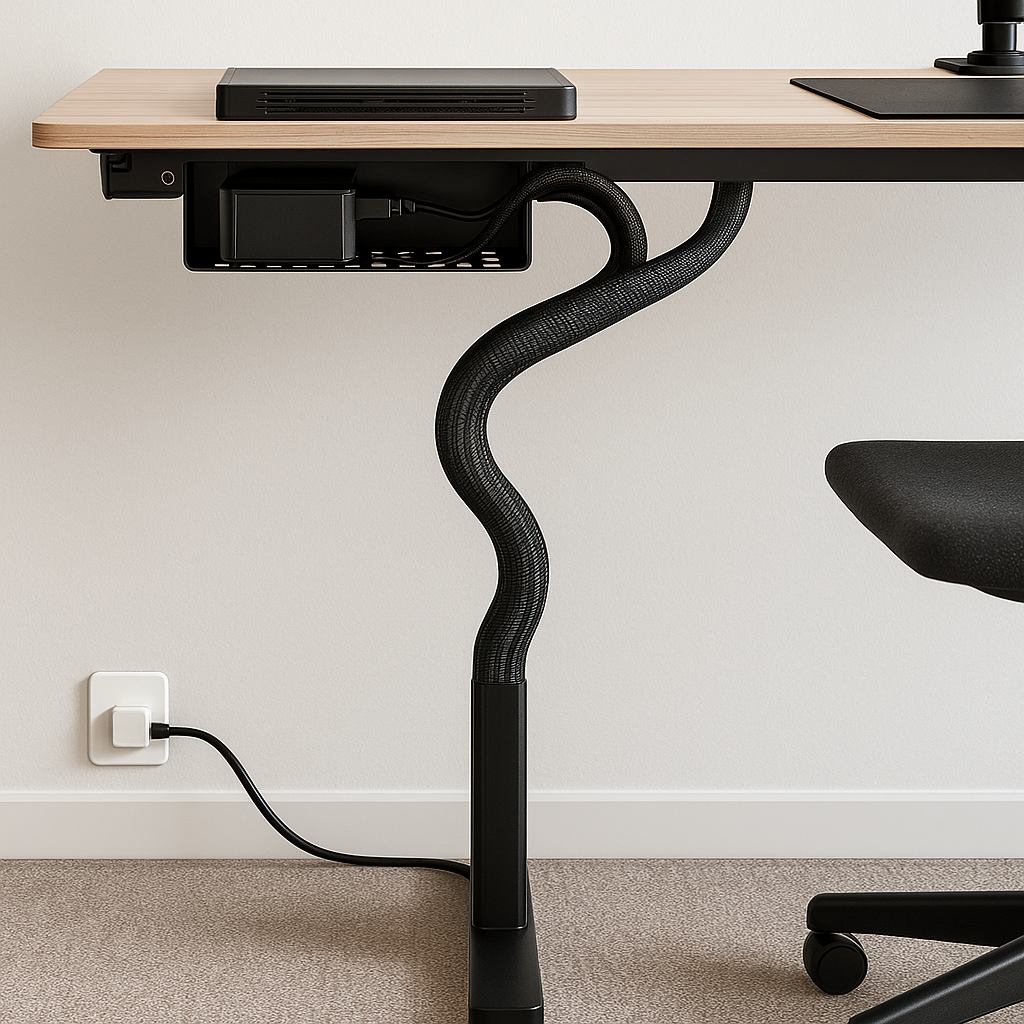
2) The Two-Harness Method (keeps motion clean on sit–stand desks)
-
Harness A: Stationary — power strip/UPS, chargers, extra slack, Ethernet hub live in the tray.
-
Harness B: Moving — only the cables that must travel with desk height (monitor, laptop power, keyboard/mouse if wired) bundled in a sleeve that drops to the tray in a single S-curve.
Execution
-
Measure your max desk height; ensure the moving harness has 2–3 in of reserve to avoid tension at full lift.
-
Fix the harness to the rear-left or rear-right underside to keep knees clear.
-
Add an under-desk hook for headphones/USB hub to remove drag from the harness.
3) The 7-Cable Canon (and how to tame each)
-
Monitor Power — shorten with a 3-ft IEC or use slack spool in tray.
-
Monitor Signal (HDMI/DP/USB-C) — route separately from power for fewer artifacts; use right-angle ends to reduce strain.
-
Laptop Power — brick lives in the tray; a short DC lead runs up.
-
Dock to Laptop (USB-C/Thunderbolt) — choose a captured path through a grommet; one motion, no snags.
-
Keyboard/Mouse — go wireless or run a thin paracord-style cable; anchor with two clips near the desk edge.
-
Audio (speakers/interface) — keep away from AC runs; cross power at 90° when paths must meet.
-
Ethernet — prefer wired for calls; use a flat white/black cable and tack along baseboard to the outlet.
4) Desktop Discipline (the visible layer)
-
Desk mat defines the work zone and hides micro-routing under its edges.
-
Front-edge clips for one charging cable (phone) and one spare USB-C only.
-
Charging stand for phone/earbuds consolidates two cords into one magnetic cable.
-
Monitor arm frees desk depth and collapses visual clutter.
-
No OEM cable coils on the surface—excess lives in the tray.
5) Labeling & Inventory (future-you will thank you)
-
Use a labeler on both ends of every cable:
MON_PWR,MON_DP,DOCK_USB-C,ETH,LAPTOP_DC. -
Date the surge/UPS install and battery swap on a small label.
-
Keep a zip pouch in a drawer: spare Velcro ties, right-angle adapters, 1–3 ft patch cables, alcohol wipes.
6) Safety, Grounding & Load (non-negotiables)
-
Never daisy-chain power strips. If you need more sockets, install a higher-capacity strip or a second strip on a separate wall outlet.
-
Check the rating (joules for surge protectors; VA/W for UPS). Match to your load (tower + monitors need more than a laptop rig).
-
Keep power bricks vented in the tray; no fabric contact; avoid dust nests.
-
For standing desks, create a drip loop on the main wall cord—liquids spill down, not into the outlet.
-
Replace frayed cables immediately; inspect quarterly.
7) The 90-Minute Makeover (copy-ready sequence)
Minute 0–15 — Empty & Map
-
Unplug everything. Wipe surfaces. Decide left or right harness path and measure max desk height.
Minute 15–35 — Mount the Spine
-
Install tray and under-desk power. Add vertical raceway down the leg. Test fit the wall plug.
Minute 35–55 — Build Harness A (Stationary)
-
Place bricks/chargers in tray. Cut Velcro into 6–8 in strips. Label socket order on the strip:
1-UPS,2-Dock,3-Monitor, etc.
Minute 55–70 — Build Harness B (Moving)
-
Sleeve only the moving lines. Form the S-curve. Add two adhesive anchors—one near desk edge, one mid-underside.
Minute 70–85 — Desktop Pass
-
Route display cable through grommet. Clip two front-edge charge leads. Seat the monitor arm. Lay the mat.
Minute 85–90 — Test & Trim
-
Raise/lower desk: ensure no tension, no swing. Trim Velcro tails. Photograph back and under-desk for your records.
8) Troubleshooting (symptom → cause → fix)
-
Cables pull tight at full height → moving harness too short → add 2–3 in slack and re-anchor the S-curve.
-
Adapter bricks fall out of tray → insufficient lip or vertical mounting → switch to a closed raceway or add hook-and-loop straps around bricks.
-
Hum or audio buzz → audio parallel to power → separate runs; cross at 90°; add a ground loop isolator if needed.
-
Foot snags → cables escaping front edge → add edge clips and move harness to rear quadrant.
-
Heat in tray → overpacked bricks, poor airflow → space devices, add vented tray, or relocate one charger to a second strip.
9) Advanced Options (when you want immaculate)
-
Under-desk outlet module (hardwire by an electrician) for a truly single wall cord.
-
Pop-up or flush grommet with USB-C PD on the desktop to retire loose chargers.
-
Cable combs for symmetrical GPU/display runs in multi-monitor setups.
-
Color discipline: all-black or all-white cables; mix breeds visual noise.
-
QR sticker under desk linking to a wiring diagram photo you just took.
FAQ
Q: Tray or raceway—what’s better?
A: Trays breathe and hold bricks well; raceways hide fully. Many desks use a tray for power + raceway for signal.*
Q: Do I need a UPS for a laptop setup?
A: If you rely on external drives, docks, or monitors, a small line-interactive UPS prevents glitches and gives you time to save and shut down.*
Q: Velcro vs zip ties?
A: Velcro wins—adjustable, gentle on cables, reusable. Zip ties are final and can crush jackets if overtightened.*
Q: How often should I redo cables?
A: Quarterly quick checks and an annual deep refresh coincide nicely with OS updates and spring cleaning.*
Epilogue / CTA
Let power be quiet and order be visible only in its absence. Start with the under-desk surge or UPS, add the tray, build the two-harness path, and label like a librarian. DeskDen Supplies stocks surge protectors, UPS units, trays, raceways, sleeves, Velcro ties, labelers, grommets, mats, hooks, and monitor arms—everything you need to make calm look inevitable.